Tuber Time

There is an upside to when the temperature dips into to chilly range; cooking up warming dishes with tubers. Prepared an infinite number of ways, tubers such as beets, carrots, sweet potatoes, taro, yams, and potatoes are prime ingredients to add to the soup pot for texture, thickening and flavor. What’s even better is each tuber can stand on it’s own or be combined with others. Considering they have a long shelf life tubers are perfect to keep on hand in your pantry for preparing a last minute dish. 

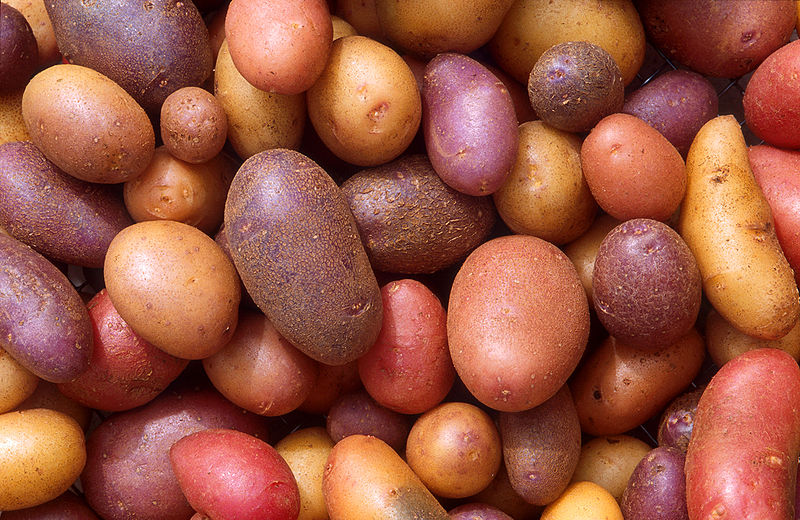
In this soup recipe I roasted the tuber to caramelize the natural sugars in the potatoes. A mixture of potatoes can be cooked, but I used the Yukon potatoes because of the golden, buttery-tasting waxy flesh that gives an earthy finish to the taste of the soup.  

Roasted Potato Soup
Recipe by George Hirsch | Makes six-eight servings 

3 cups Yukon, red or russet potatoes; scrubbed & chopped into 1/2 inch pieces 
4 Tablespoons pancetta, chopped
1 cup sweet onion, chopped
8 cloves garlic, peeled left whole 
Olive oil 
2 teaspoons fresh thyme, chopped
fresh ground black pepper
1 teaspoon sea salt
6 cups chicken broth
2 cups kale washed and chopped
Hot sauce to taste
Pinch of fresh grated nutmeg
3 cups chicken broth
1/4 cup half and half
* Arugula, spinach, or escarole may be substituted for kale

Pre heat oven to 325 degrees. 

In a sheet pan or low-sided roasting pan add chopped potatoes, pancetta, onion, garlic, olive oil, thyme, pepper and salt. Roast for twenty minutes and toss to evenly brown. After twenty additional minutes add kale and cook for ten more minutes. 

Remove roasted potatoes from oven and place in a large soup pot. Add about 1/2 cup of chicken stock to sheet/ roasting pan to deglaze all bits of food from bottom of pan. Scrape bottom of pan with a wooden spoon. Pour drippings into soup pot. 

Add remaining chicken broth to soup pot.  Increase temperature, bring soup up to a boil, and then lower to a gentle simmer for 30 minutes. Use an immersion blender with a couple pulses to puree; or use food processor. Bring soup back to a boil, add nutmeg and additional broth if required. Just before serving, gently stir in half and half and hot sauce to taste.

Servings suggestions:

For a more elegant version, top soup with sour cream or creme fraiche; and cooked crab meat, or poached shrimp, or scallops, or oysters.

Morning Mate Unplugged

The Chemex Coffee Maker is so simple to use. I've been enjoying my Chemex all summer long. It reminds me of food chemistry class—yes, there is a science to this coffee making madness. I pair my Chemex with filtered water and freshly ground Columbian Supremo coffee beans.  It amazes me how many people I know can talk about making a good cup of coffee. BTW, Chemex made my Good Stuff pick!

Read on about the invention of Chemex and the intructions for making an exceptional cup of coffee.

About the Maker | chemexcoffeemaker.com

     The Chemex® coffeemaker was invented by Peter J. Schlumbohm, Ph.D., in 1941.  Schlumbohm was born in Kiel, Germany in 1896.  He received his doctorate in Chemistry from the University of Berlin.  After several trips to the United States, he settled in New York City in 1936.  Over the years, he invented over 3,000 items for which he was granted patents.  However, his coffeemaker and carafe kettles were his most long enduring inventions.

     Being a doctor of Chemistry, he was very familiar with laboratory apparatus and the methods of filtration and extraction.  He applied this knowledge when designing his coffeemaker.  He examined his laboratory glass funnel and his Erlenmeyer flask and made modifications to each.  He modified the laboratory funnel by adding an "air channel" and a pouring spout.  He added the "air channel" so the air displaced by the liquid dripping into the vessel could easily escape past the laboratory filter paper, which was to be used in the funnel as the filter media.

     To the well of the Erlenmeyer flask he added a protrusion, which looks like a bubble.  Consumers have often called it a "belly button."  This is a measuring mark, which indicates one half the volume that is below the bottom edge of the handle.

     He then combined the modified glass funnel with the modified Erlenmeyer flask to create a one-piece drip coffee maker to be made of heat proof, laboratory grade, borosilicate glass.  Last, he added a wood handle and called the item a "Chemex®," which was a fabricated name.  All that was needed then to brew the coffee was the coffee, hot water, and filter paper.

     Schlumbohm designed the water kettle, or carafe kettle, three years later.  His goal was to create an attractive yet simple and fabulous vessel.  Again he chose heatproof borosilicate glass as the material.  He designed a boiling kettle which has no lid, but which is nevertheless almost completely enclosed.  The "steam stopper" prevents the steam from coming into contact with the upper portion of the neck.  Thus, this portion remains cool and is used as the handle.

     Over the years, these items have been recognized as outstanding examples of American Design.  In 1956, the coffeemaker was selected by the Illinois Institute of Technology as one of the best-designed items of modern times and it was the only coffeemaker so designated.  The coffeemaker and the water kettle are in the permanent collections of museums such as the Museum of Modern Art in New York, the Smithsonian, the Philadelphia Museum and the Corning Museum located in Corning, NY.  The coffeemaker completed a traveling exhibition tour of a number of countries in eastern Europe as part of the "United States Information Agency's Design in America Exhibition."  In the fall of 1989, it toured with the "Design, USA" exhibition to the former USSR.

Chemex® Brewing Instructions

1.  Open the Chemex-Bonded® Coffee Filter into a cone.  One side should have three layers.  Place the cone in the top of your coffeemaker with the thick portion toward the pouring spout.

2.  Using Regular or Automatic Grind coffee only, put one rounded tablespoon of coffee per 5 oz. cup into the filter cone.  If you prefer stronger coffee, use more; there is never any bitterness in coffee brewed using the Chemex® method.

3.  When the water is boiling, remove it from the heat until it stops boiling vigorously.  It should now be at about 200ºF, a perfect brewing temperature.  Pour a small amount of water over the coffee grounds, just enough to wet them without floating.  This is important because it allows the grounds to "bloom," so the desirable coffee elements can be released.

4.  After this first wetting simply pour more water, soaking the grounds each time, but keeping the water level well below the top of the coffeemaker.  Once the desired amount of coffee is brewed, dispose of the spent grounds by lifting the filter out of the coffeemaker.  And that's it!  You are now ready to enjoy a perfect cup of coffee!

Tea Brewing Instructions

     Follow the instructions for brewing coffee.  In place of coffee, measure in your favorite loose tea, one level teaspoon for each cup.